Monday, February 21, 2011

Not So Door Wreath!

Can you hear it.......can you feel it?! Ahhh.....yes, it finally feels like Spring is on it's way! After a looong cold winter, I'm so excited to be able to do some projects for the outside! Now when I paint something outside it actually dries!lol On Friday I was ready to take down that unimaginative blah remnant of Christmas and winter wreath that was on my door.....I just got tired of looking at those pine cones! I was ready to do my usual switch out of winter wreath to spring wreath....when I noticed, it was looking pretty sad! The butterflies on them looked like they've been through a battle, and the the pretty spring green it once had was starting to look grey. So I decided I wanted something different....something new....not your usual door wreath. I wanted it to reflect the colors inside my home.....and be able to leave it up through all the seasons. Well, remember when I told you I have this infatuation with twigs, and birds....with the use of stuff I had around the house.....this is what I came up with!

I used an old picture frame, 2 pieces of clear acrylic, some artificial twigs with berries, and the tiebacks I didn't end up using from the curtains in my kitchen.

First I painted the old picture frame white with acrylic paint and sprayed it with clear acrylic sealant after it dried......Then I drew a picture of birds on the clear acrylic (or you could do it on the glass from the frame) with a permanent marker on the back side. You will also fill it in with paint at least 3 coats on the back side. So when you turn it right side up...the paint will look smooth.


I used clear acrylic because it was much lighter and safer than glass since it was going to be placed on the front door. I used two sheets (one I painted on and the other I placed on the back side of the picture to protect it) which I got from one of those cheap kid frames that I bought for 1 dollar.


Your wreath could be made with anything you desire....I know you're thinking that's not very spring like......but again use things that you love.....flowers, leaves, twigs, the possibilities are endless! Make it a reflection of what you love and what you want everyone to see as a reflection of your home.

I tied the twigs together with floral wire and screwed on the four corners of the frame, on top and bottom picture hooks so that I could wind the floral wire through it and attach it to the wreath.


Use any wide ribbon you like and attach it to the back of the frame.  


And there you go......a great alternative to the usual wreath! You could place anything you like inside the frame.....from pictures to quotes or just good ol' "Home Sweet Home." :o)

Tuesday, February 15, 2011

Sweet Baby!

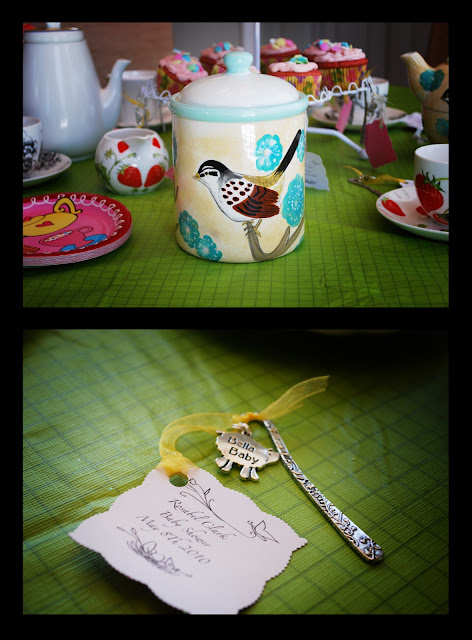
Finding out this morning that my cousin is having a baby boy (Yay!!!) just made me think about the baby shower I gave my sister last year for her sweet baby girl. I love giving parties especially "Themed Parties" Yes, I am one of those crazy people that goes all out for Halloween, I make my own costumes for my self and children....I am also that weirdo eccentric that dresses up for the Renaissance festival....even though I'm not part of the fair.....phew! I'm glad I got that off my chest.lol  I used to make costumes for my husband and he would actually wear them....but this was before we got married...hmmm....I guess he didn't have to impress me any more he got smarter after.lol  I wanted to share with you some pictures of the things I made for my sisters baby shower and maybe give you some Ideas, because even though the colors are pink and green, they could be applied to any party just by changing the colors and theme. My theme was "Garden Tea Party" of course so appropriate for a sweet baby girl :o)


I was on a budget so I made some of my decorations with things I had around the house.
I had scrap book paper That I cut out with craft scissors and used hole punches with fun shapes to add interest and bought butterfly stickers to decorate them with and strung them on pretty ribbon. I have these atrocious chairs in my breakfast nook that look like it's been through a war.....I covered them up with some sheer panels I had saved and tied them back with rubber hair ties and placed a flower on top. A great way to save is shop when they clear out items from every season.....I just happened to have this party after Easter so it was perfect to grab up all those spring clearance Items! I made a home made chocolate cake and covered it with this edible grass (from Easter) that tasted yummy like apple flavor! I used scrap book 3d stickers and purchased 2 packs of the same stickers so I could place them back to back with a toothpick in the middle so I could place them on the cake. 


I bought book mark sticks (from any craft store) .......I love the charm I found, so sweet! Just attach them with a jump ring. I printed out labels on scrapbook paper (the other side is glittery pink) then cut them with craft scissors.  I live next to a discount store so I would go once a week and check their clearance section...I bought mix matched tea sets and containers which made the table look cute and colorful!

It was so much fun! See how I hung and spread out the souvenirs :o)......When doing a party take your time, doing things waaay ahead of time is much easier on the budget.

Friday, February 4, 2011

My Dream Dining room!

In a perfect world of unopinionated husbands and never ending funds this is my dream dining room....Idea.lol Sometimes I just love going through the Internet and browsing and saving photos of things I would love to use in future projects. I've had this idea of giving my dining area a fun, funky retro feel. I think retro fabrics have so much character. I also want my dining area to still tie in to the rest of the house but in the same time having it's own space. Because the dining room is the space used for entertaining, I want it to feel lively and fun! I treat decorating the same way as I would getting dressed for a special occasion. You have the base which is your outfit which either has pattern or a plain color, then the accessories that accentuate the outfit like shoes, handbag and jewelry (which is the bling in the room).  Well here it is...my Idea...it all started from this fabric that I found on Fabric.com.

This fabric just makes me smile :o) There is just something about it I love! maybe it's the quirkiness about it?
Well here is my palette Idea for the whole room......

I can't decide on the paint color.....but I'm thinking the one in the middle....what do you think?
 I want to anchor the windows with velvet black drapes to give it a rich luxurious feel and layer it with the two fabrics to soften it up.

I love these accessories I found in zgallerie......

So pretty! I just love how the black would compliment the drapes.


I have always been fascinated with the art deco period and love old glam movies....I love how this beveled mirror buffet server has that feel. Martinis anyone?!lol

Love the deer head....and how cute are those birds!

Add caption
Well that's it! This will be my ultimate project so I'm gonna enjoy it and take my time.....maybe.lol


Tuesday, February 1, 2011

Bedroom in progress Phase 1

Okay I admit I am one of those people who are very erratic when it comes to projects.lol I currently have 4 going on right now. So far this is the project I started in Jan. and have yet to finish....maybe this week? It depend on how my week goes, I have two boys remember. I pretty much do my painting in the morning when my 4 year old son is sleeping or else he has the idea that he can paint too. I have the most stubborn 4 year old in the world so to him "No" means "Yes"! The color I chose for this room is actually a stretch from the colors I normally choose. I usually go for lighter earth tones, but to a pleasant surprise I love it! Instead of making the room feel dark it actually made it feel serene.  The color is called "Deep Twilight Blue" from the Valspar line. I used this color for the accent wall behind the bed because I felt like I needed the dark color to anchor that wall. The room will have so many heavy furniture like a dresser and chair etc. I didn't want those things to take a way from the focal point which is the bed. I plan to paint the other walls in "Woodlawn Silver Brook" which is 2 shades lighter. I call this Phase 1 and so far this is the outcome!

Before......I should have taken a pic. of my old bedding on the bed with the gold and red theme, but you get the idea with the box valance.


After......ahhh, so much better! I don't have a headboard yet so I made this painting and placed it above the bed for now. Thank goodness I had those box valances from last time because all I had to do was wrap it with the new one! I just used a few black head sewing pins which worked pretty well.

As you notice the other walls on the sides are still white.lol I searched everywhere for off white panels that would be long enough and I wouldn't have to pay an arm and a leg for. I finally found some at Ikea! Love that store! Well anyways.....this is it so far....I will post other updates on this project soon!

About Me

I am a mom with three boys (that includes my husband) that keeps me on my toes. I love anything artistic. Back in the day, what I call B.C. "Before children" I was very active in the art community and I had all the time in the world to paint my heart away. Now I have changed my focus on family and express my creativity in small projects. In this blog I will be sharing my love for Art, Painting, Design, DIY's, Photography and just being Crafty.